Mediterranean Hummus Bowls

These humus bowls were a fun change up for lunch. They were also delicious cold which meant I didn’t need to wait in line for the microwaves and could eat right away! With the addition of hummus, these bowls have a lot of flavor and are great if you need to pull something together quickly for lunch!


Mediterranean Hummus Bowls

Ingredient List:

  • 1.5 cups brown rice or quinoa
  • 1 cup grape tomatoes, sliced
  • 1/4 cup red onion, sliced
  • 1 cucumber, sliced
  • Feta cheese
  • 8 oz can chickpeas, drained and rinsed
  • 1 tbsp garlic powder
  • Hummus

Recipe Directions:

  1. Coat chickpeas in garlic powder and roast for 20-25 minutes at 425°
  2. Cook rice/quinoa according to package instructions
  3. Prep bowls:
    • Top rice with tomatoes, red onion, cucumber, feta cheese, chickpeas, and hummus
  4. Serve!

Follow my page on Instagram to get the latest on new posts and blog activity:

https://www.instagram.com/gabmaria__/

Broccoli Salad

Products listed are independently selected. If you buy from one of our links, we may earn a commission.


Last weekend I came back from California on Sunday with just enough time to get to the grocery store and get to bed on time. Since I’m not near a major airport, I have split my flight into two and have a layover. For these flights, the only layover available was for 4 hours, which is the length of one of the flights. Needless to say, I was exhausted by the time I was home.

Due to this, my goal was to make something very easy for lunch that required minimal prep work. For this dish, I used full broccoli heads, so that had some prep work, but for the most part, it was really straight forward.


Broccoli Salad

Recipe List:

  • 2 heads broccoli
  • 1 small red onion, diced
  • 1 cup shredded carrots
  • 1 cup shredded cheese
  • Handful of dried cranberries
  • Handful of roasted walnuts
  • Your favorite creamy/thick dressing
    • I used a Avocado Green Goddess dressing

Recipe Directions:

  1. Cut broccoli heads and stem into bite-sized chunks
  2. Mix ingredients in a large bowl
  3. Add in dressing and mix until well coated
  4. Serve and enjoy!

Other Notes:

  • I added rice as a base to make this a more filling dish (and it ended up being really filling)
  • I would recommend steaming the broccoli. It was delicious as was, but I think softer broccoli would have made it easier to eat
  • I would maybe add some shredded chicken next time to make this fuller

Follow my page on Instagram to get the latest on new posts and blog activity:

https://www.instagram.com/gabmaria__/

Yellow Rice with Lemon Garlic Chicken

Products listed are independently selected. If you buy from one of our links, we may earn a commission.


I’ve officially relocated for my new job role! Although I didn’t do much of the packing, it was a bit exhausting seeing how much stuff I have and imagining where it would all go in the new apartment. Thankfully, most items have found their place. There are a few things to put away still, but it’s coming together nicely. The kitchen was my biggest challenge! I was worried there wouldn’t be enough cabinet space for all the kitchen equipment, but thankfully the pantry is quite large, so I was able to keep some things in there.

I’m now living in a state and a city that I’ve never been in before. I was a little nervous at first and didn’t know what to expect, but the area has really grown on me, and I like it a lot. I’m excited to be somewhere new!

Although it was beautiful for my move and a few days after, the rest of the week was cloudy, rainy and cold. So, for April, I thought I’d bring a little color back with my Color Series! For April, we’re doing the color Yellow using a bit of turmeric!

Some suggested health benefits of turmeric include reducing inflammation and neutralizing free radicals in the body.

PULLED FROM CLEVELAND CLINIC

There are 3 aspects to most of my meals: the base, the veggies, and the protein. For the veggies this week, I diced up yellow bell pepper and yellow squash and sauteed them. Check out the recipe below to bring a little yellow to your meals!

Product Recommendations:

  • I use large reusable storage bags which are great for marinades and cutting down on waste – Stasher 1/2 Gallon Bags

Yellow Rice with Lemon Garlic Chicken

Rice Recipe List:

  • 2 cups long grain white rice
  • 2 tbsp butter
  • 1 small/medium onion, diced
  • 1 tbsp minced garlic (4 cloves)
  • 1 tsp turmeric powder
  • 3 cups vegetable stock
  • salt and pepper to taste
  • parsley to garnish

Chicken Recipe List:

  • 1 pack boneless, skinless, chicken breast
  • 1 lemon
  • 1 tbsp minced garlic (4 cloves)
  • 1-2 tbsp olive oil

Rice Recipe Directions:

  1. Rinse rice until water runs clear
  2. Melt butter in pot over medium heat. Sauté onion and garlic until fragrant (1-2 minutes).
  3. Add turmeric powder and combine. Stir in rice until lightly toasted and well coated.
  4. Mix in vegetable stock, salt, and pepper, and bring to a boil. Cover and reduce heat to low. Simmer for 15 minutes.
  5. Remove from heat and allow to cool for 5 minutes before fluffing. Add parsley to garnish.

Lemon Garlic Chicken Directions:

  1. Cut chicken into 1-inch cubes
    • If breasts are thick, slice in half to thin
  2. Slice lemon into 4 wedges
  3. In 1/2-gallon bag, add chicken, lemon juice, lemon wedges, olive oil, garlic.
  4. Allow to marinate for 1-hour minimum. Then cook.

Follow my page on Instagram to get the latest on new posts and blog activity:

https://www.instagram.com/gabmaria__/

Basic No-Knead Bread

Products listed are independently selected. If you buy from one of our links, we may earn a commission.


I am not a baker by any means. Baking cookies, even with directions, is something I find difficult. Although I enjoy cooking, baking is a whole different game to me. With that being said, I really want to learn how to bake, especially bread.

This No-Knead Bread is a great recipe for beginners to try out. I was amazed at how easy and hands-off this process was. The most. hands-on experience I got from this recipe was mixing the ingredients at the beginning. I found this to be much easier to do with my hands rather than a spatula, spoon or whisk.

Overall, this bread was easy to make and was delicious! After baking, I sliced my bread and stored it in the freezer to make toast for breakfast or as a snack.

Cooking Recommendations:

  • Dutch Oven with an oven-safe lid up to 500º – Amazon Basics Dutch Oven is a great choice
  • A sustainable way to cover your dough as it rises – Beeswax Wrap
    • I personally love using Beeswax wrap for almost anything! They’re great to have in the kitchen

Basic No-Knead Bread

Recipe List:

  • 3/4 tsp active dry yeast
  • 2 tsp sea salt
  • 3 1/4 cups all-purpose flour
  • 1 1/2 cups warm water

Recipe Directions:

  1. Mix ingredients, except water, in a large bowl.
  2. When combined, add water and stir until well mixed
    • The dough will be very sticky and not hold a shape
  3. Cover bowl and let dough rise at room temperature overnight (or 6-8 hours)
  4. Add flour to your countertop or onto parchment paper
    • Transfer dough to surface and fold dough onto itself a few times to shape
    • If sticky, sprinkle more flour
    • Cover with a kitchen towel and let dough rise for another hour
  5. At the 30-minute mark, heat oven to 450º with Dutch Oven inside
  6. Remove Dutch Oven from oven
    • Using parchment paper, transfer dough into Dutch Oven
    • Cover and bake for 30 minutes
      • If you don’t have an oven safe lid, you can use aluminum foil
    • Remove lid and bake for another 10-20 minutes
  7. Remove and transfer bread to a cooling rack for 15-30 minutes before serving

Follow my page on Instagram to get the latest on new posts and blog activity:

https://www.instagram.com/gabmaria__/

Kale Potato Soup

Today’s blog formatting may be wonky as I am currently without a computer to do proper formatting updates. Thank you for your continued support!


It’s been two weeks since my last post and a lot has happened since then.

I received my Capstone project which I’m really looking forward to. I think I have a great team, and a great project, so I’m looking forward to getting started! I also received the details for my next job rotation. I’ll be switching in April and I’m also very excited for that opportunity.

In my personal life, I’m currently in Costa Rica. A friend of mine is celebrating his birthday and wanted to spend a week in Costa Rica I was invited to join. We’ve only been here for one day, but we did a Night Hike last night. Very cool and very interesting. We saw a sloth! And lots of bugs. And now I’m bugged out.


This week I’m sharing a recipe that part of the Color Series for March! For March I picked the color green for St. Patrick’s Day of course. I made a Kale Potato Soup which was delicious. It was topped with bacon and sour cream.

This recipe is from a magazine I had found last year, but recently spotted it again at my local grocery store. I’m unsure of the magazine name, but it referenced Easy Soups & Stews with a big soup bowl on the front of a white background. It’s easy to spot!


Recipe List:

  • 10 cups kale
  • 1 3/4 lbs Yukon potatoes, peeled and diced
  • 3 slices bacon, chopped
  • 1 leek, halved and sliced
  • 2 cloves garlic
  • 4 cups chicken broth
  • 1/4 tsp Worcestershire Sauce
  • 1 tbsp olive oil
  • 1 tsp fresh rosemary
  • Salt and Pepper
  • Sour cream

Recipe Directions:

  • Cook bacon until crisp, about 5 mins. Remove.
  • Add potatoes and leek and cook until slightly softened, about 3 mins. Add garlic, rosemary, salt and pepper. Cook until browned, another 2 mins.
  • Add broth and 4 cups water and bring to a simmer. Cover and cook for 15 mins. Add 3/4 of kale, cover and cook for 5 mins. Add Worcestershire sauce.
  • Preheat broiler. Toss remaining kale with olive oil, salt and pepper, and place on baking sheet. Broil about 3 mins. Thin sour cream with water.
  • Purée soup with immersion blender, or working in small batches in a blender. Ladle into bowls and serve with bacon, almonds, sour cream and kale chips!

Red Tomato Salad

Today is the last post from what has been a very fun February Color Series! Next week I’ll do a regular recipe, and from there we’ll be transitioning into March for the color green!

This was a great side salad to pair with lunch or dinner, and was delicious both cold and warmed up. Prep work was the longest part of making this dish, but overall it was very quick and easy. Save yourself time and purchase pre-sliced roasted red bell peppers!


Red Tomato Salad

Recipe List:

  • 1 small or 1/2 medium onion, sliced thin
  • 3 Roma tomatoes
  • 1 thin jar or 1/2 a large jar of roasted red bell peppers, sliced
  • 3 large purple carrots, halved and sliced thin
  • Basil
  • 1 tbsp balsamic vinegar
  • 2 tbsp olive oil
  • Salt and pepper to taste

Recipe Directions:

  1. Prep onion, tomatoes, roasted red bell peppers, and purple carrots
  2. Mix veggies with basil, balsamic vinegar, olive oil, and salt and pepper
  3. Serve!

Follow my page on Instagram to get the latest on new posts and blog activity:

https://www.instagram.com/gabmaria__/

Chia Pudding Yogurt Parfaits

Disclaimer: Any links are provided as a convenience and for informational purposes only; they do not constitute an endorsement or an approval of any of the products, services or opinions of the corporation or organization or individual.


When I was younger, breakfast was usually a bowl of cereal with some fruit and a glass of milk. On weekends we sometimes had a more elaborate breakfast of eggs, sausage and bacon. Growing up this was alway great and hit the spot. As I got older, this didn’t satisfy the same morning hunger and eventually I stopped eating breakfast all together and just. had a cup of coffee.

As part of the Color Series I am working on, I was looking for a red/pink themed breakfast I could make that would also be practical to bring to work. There were a lot of great ideas online, but very few were realistic to bring to the office. I saw someone blend some strawberries to add to chia pudding and I thought that would be a great place to start!

Full disclosure: I don’t actually like the texture or taste of chia pudding, or pudding in general. Mixing it in with the yogurt was a great way to disguise the chia pudding and still get the benefits.

Chia seeds are a great source of fiber and also contain omega-3 fat, antioxidants, and more.

I’m thinking of also making a blue berry themed chia pudding parfait, but for now enjoy my Strawberry Chia Pudding Parfait and my Vanilla Chia Pudding Parfait. Thear are super work-friendly, easy to throw in your lunch bag, and also very easy to clean at the end of the day (straight into the dishwasher!).


Strawberry Chia Pudding Parfait

Recipe List: Makes 6, 6oz parfaits

  • 2 packs of strawberries
    • 1 pack halved/sliced, 1 pack for blending
  • 4 tbsp chia seeds
  • 1 cup milk (I used almond milk)
  • 1 tbsp honey
  • Strawberry yogurt
  • Granola

Recipe Directions:

  1. Prep the chia pudding (I recommend doing this the night prior)
    • Mix chia seeds, milk, and honey in a bowl and refrigerate overnight
    • The next morning the chia seeds will have expanded and create a pudding-like texture
      • Instead of overnight, you can also refrigerate for 4 hours and check, if they’re not at a consistency you like, mix, and let sit for a little longer
  2. Prep the strawberry blend
    • Add one pack of strawberries to a blender and pulse. You don’t want to make this a think blend. It’s just an extra touch of sweetness to add to your breakfast
  3. Make your parfaits!
    • Coat base of Mason Jar in strawberry purée
    • Add chia seed pudding (I did one scoop)
    • Add strawberries
    • Add strawberry yogurt (I added enough to cover the strawberries)
    • Add more strawberries
    • Add granola

The amount you put for each layer is really up to you based on what you like! These directions are just approximates of what I did to make mine, but have fun with it!

Vanilla Chia Pudding Parfait

Recipe List: makes 6, 6oz. parfaits

  • 1 pack of strawberries, halved/sliced
  • 1 pack of blueberries
  • 4 tbsp chia seeds
  • 1 cup milk (I used almond milk)
  • 1 tbsp honey
  • Vanilla yogurt
  • Granola

Recipe Directions:

  1. Prep the chia pudding (I recommend doing this the night prior)
    • Mix chia seeds, milk, and honey in a bowl and refrigerate overnight
    • The next morning the chia seeds will have expanded and create a pudding-like texture
      • Instead of overnight, you can also refrigerate for 4 hours and check, if they’re not at a consistency you like, mix, and let sit for a little longer
  2. Make your parfaits!
    • Add 3 scoops of yogurt
    • Add chia seed pudding (I did one scoop)
    • Add strawberries and blueberries
    • Add scoop of yogurt (plus a little more to cover fruit)
    • Add more strawberries and blueberries
    • Add granola

The amount you put for each layer is really up to you based on what you like! These directions are just approximates of what I did to make mine, but have fun with it!


Follow my page on Instagram to get the latest on new posts and blog activity:

https://www.instagram.com/gabmaria__/

Roasted Red Bell Pepper Chicken with Red Rice

Disclaimer: Any links are provided as a convenience and for informational purposes only; they do not constitute an endorsement or an approval of any of the products, services or opinions of the corporation or organization or individual.


I’m hitting a point where I’m cooking more than I can post! It’s very exciting for me because it means I’m starting to build a collection of recipes. It also means I can start posting more frequently. I haven’t decided yet what the new post schedule will look like. I recently switched to posting on Saturdays instead of Fridays, so I’d have to figure out which day in the week would be best for my second post, and when I would be able to write that post based on my work schedule. This change will likely not happen soon, as I’d like to build a bit more of a recipe collection to know I have enough. I only post what I cook, and I don’t want to have to cook extra just to make a post. That seems silly. I’m looking to see if I can make this change in late June, so stay tuned!

Some other changes to the blog are that I will be adding a Series page. Although I’ve only done two months of this Color Series, I’ve had so much func coming up with creative ways to put foods together to make meals. I’d like to do some more series in the future. Like the previous change, this will not happen this month. It will probably come around the May/June timeframe simply because I’ve got to come up with some ideas! Recipes would still be stored under their corresponding category (breakfast, lunch, etc.) but would also be found in the Series tab under their corresponding series title. I hope you’ll stick around to see those changes take effect!

With that, let’s get to it!


Welcome to the Color Series for February! I’ve got three dish ideas to share for the month of February, a lunch, a breakfast, and a side salad. Today I’ll be sharing a lunch recipe. This is a Roasted Red Bell Pepper Chicken with red rice. The sauce ended up coming out more orange than red, but it uses red ingredients, so it counts! The side salad in the pictures will be shared in a later post, so make sure you check back!


Roasted Red Bell Pepper Chicken with Red Rice

Recipe List:

  • 2 cups Red Rice
  • 2 1/2 cups water
  • Boneless, skinless chicken thigh
  • 1/2 jar of roasted red bell peppers (the thin jar!)
  • 3-5 tbsp olive oil
  • 3-4 garlic cloves
  • 1 cup sour cream
  • 1 tbsp Italian seasoning
  • Salt and Pepper

Recipe Directions:

  • Add rice and water to Instant Pot. Cook for 20 minutes on high pressure, and release for 10 minutes. Rice is ready!
  • Blend the roasted red bell peppers, olive oil, garlic, salt and pepper for your smooth chicken cream/sauce.
  • In a medium skillet, add chicken with Italian seasoning, and cook until lightly browned. Transfer to a plate.
  • Add your blended sauce and sour cream to the skillet. Cook over medium heat until well mixed and creamy, about 3 minutes.
  • Add your chicken back to the skillet and coat with the sauce.
  • Serve over rice (and add your side dish).

Enjoy! Let me know what you think.


Follow my page on Instagram to get the latest on new posts and blog activity:

https://www.instagram.com/gabmaria__/

Review: Balsamic Glazed Chicken and Potatoes

Disclaimer: Any links are provided as a convenience and for informational purposes only; they do not constitute an endorsement or an approval of any of the products, services or opinions of the corporation or organization or individual.


It’s only been about 2 weeks since I’ve been back and yet somehow it feels like it’s been longer, but I also can’t believe that January is already over. I also feel like I haven’t done very much. I’ve done some socializing with some coworkers, updated my photo albums, and played video games. That’s essentially my week’s summary. It’s been a good week, very relaxed.

I do have some exciting news. I am part of a rotational program for my job, and for the program, we complete a company sponsored project. The projects are still undecided, but I’m excited to hear what we’ll be working on, and hoping we’ll hear soon. I pitched myself as a project lead to my peers and the program’s leadership team, and I’m excited to share that I was voted for as one of our project leads! I know it’s going to be a lot of work, but I think it’s such a great opportunity. I’m really looking forward to challenging myself and learning through this process. Wish me luck!

In a second round of exciting news, which I may have shared last week, I submitted my preferences for my second location/job. The goal of this program is to help individuals develop a strong skill set to be future leaders, and so they try and rotate associates to different locations to learn the different aspects of the company, but also through different jobs. Supposedly, the leadership team met last week to discuss what was submitted, so I’m also very eager and excited to hear more news on that.

Even with my exciting news, it was still a very relaxed week.


My plan was to share this recipe last week, but I really wanted to kick off my Color Series. Making the January dish was a lot of fun. I was very nervous about it because I haven’t had much experience coming up with recipe ideas. I was worried the combination wouldn’t be good, or it wouldn’t be filling, or it wouldn’t be a good nutritious blend. The first two concerns were removed quickly. The meal was delicious. While I’m not too sure on the nutritional value of the dish, I feel that it was a good mix of different veggies, some carbs and some protein.

I loved having this chicken dish for work. The recipe was very easy, and there was minimal work on my part. I threw everything in a cast iron and essentially my job was done. This was also very filling for work which was nice. I added some rice to help the chicken and potatoes last a little longer through my week. Overall a great combination. I’m typically not a big potato person (I know, a crime), but I do really like red potatoes.

The skin of red potato is filled with fiber, vitamin B, iron, and potassium.

Pulled from Black Gold Farms

I found this recipe in one of my many cooking magazine: delish Chicken Dinners. Although this recipe was not used for dinner, I’ve found that many of the recipes in this magazine can be modified to be lunch or dinner.


Rating

9/10

Recipe

Balsamic Glazed Chicken

This is a dish where, once again, I forgot to take photos. If you are interested in seeing more of the process, check out my Instagram page! Some notes and lessons learned:

  • Adding rice was a great idea. This would not have lasted me the week otherwise.
  • I doubled the potatoes. I did one batch on Sunday with the chicken, and a second batch on Wednesday, which didn’t have as much flavor because I wanted it to be quick. However doing the two batches made sure I had enough to eat and meant I could add a little more to each dish.
  • I wish I had doubled the chicken. Maybe not fully double, but I wish I made more. I felt I had a good amount of rice and a good amount of potato, but I also felt like the chicken went so quickly. If I had made more chicken, I would have made less potato.

Follow my page on Instagram to get the latest on new posts and blog activity:

https://www.instagram.com/gabmaria__/

Seared Sea Scallops with Cauliflower Purée Sauce

Disclaimer: Any links are provided as a convenience and for informational purposes only; they do not constitute an endorsement or an approval of any of the products, services or opinions of the corporation or organization or individual.


Recipe at bottom of post. Happy cooking!


Hello everyone! Thank you for your patience while I adjusted my posting schedule and also had some unexpected events in my personal life. I also really appreciate the following support on my Instagram. Although I was offline for a little more than two weeks, I actually gained some additional followers which was a nice surprise.

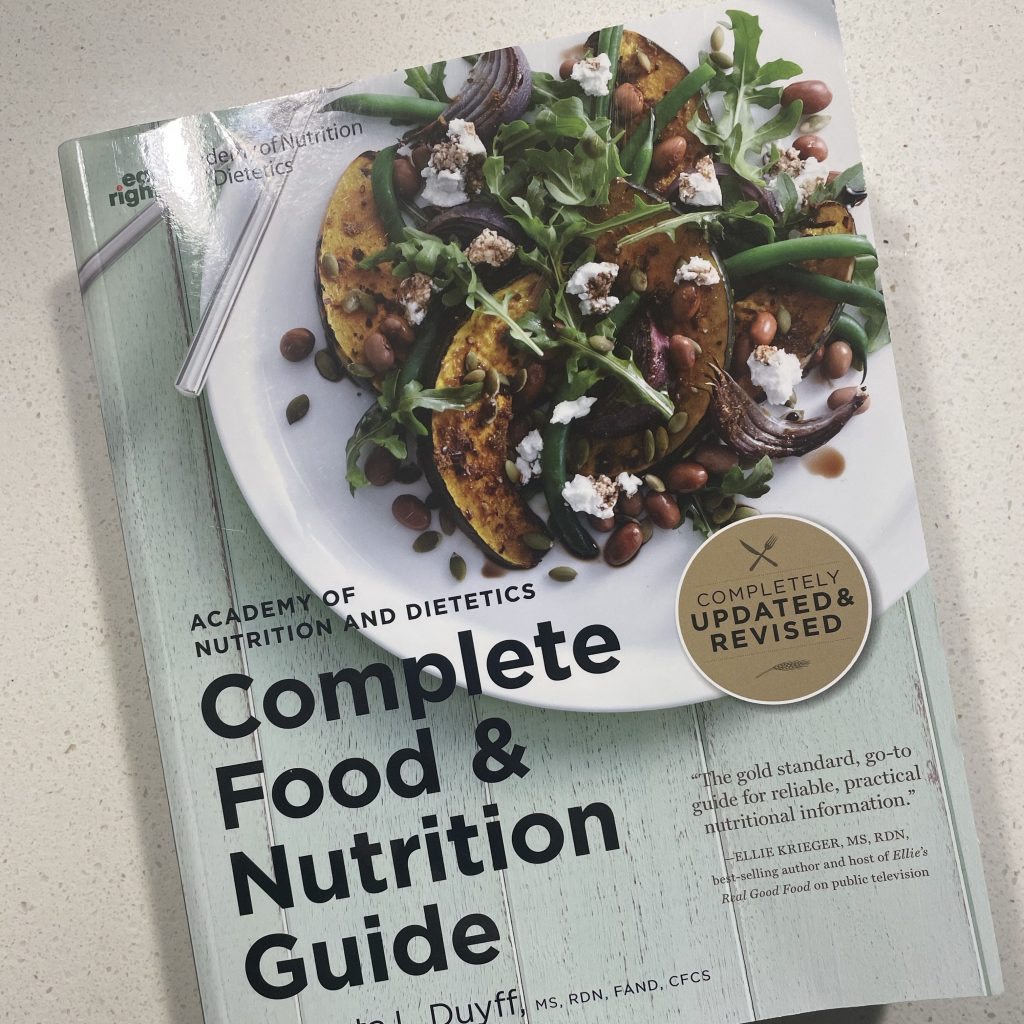
I haven’t had a chance to post any updates so I’ll start with that. For Christmas, I was gifted a noddle maker and a massive nutrition book, both of which I’m super excited to use. The noodle maker is exciting because I’ve been looking to start making more foods from scratch whether that be pasta, marinara sauce, pickles, etc. I really want to see what I can do.

The nutrition book is significantly larger than I was expecting. I thought it was a normal sized book – it’s a whole textbook. There’s a lot to go through, but I am excited for it because I want to start making my own dishes instead of focusing on recipe reviews. With the dishes I make, I want to make sure they’re covering all of my nutrition basics and why. I really enjoy learning, so this is a great way to enjoy my cooking a bit more.

A fun gift that was unexpected was a set of assorted olive oils and vinegars. Thankfully, a little recipe book came with them to offer some ideas, but I’m excited to try those out to see what new flavors I can bring to my food.

Naturally, all of these wonderful gifts will be used in my cooking blog! I’ve really enjoyed trying new recipes and making some of my own. The hardest part for me is remembering to record videos and take pictures, and remembering to post it. I think I find it hard because I enjoy cooking and I enjoy sharing my cooking, but my motive behind it is not to grow a following or have a famous Instagram account or anything. I enjoy writing and cooking, and this was a great way to bring those two aspects together. However, doing the recordings and posting on Instagram is the way for me to share these meals with other people. So although it’s sometimes difficult, I try to keep that in mind to boost my video-recording motivation.

I have many more updates since I’ve last posted, but I’ll save those for next week’s post so that we can get started!


This week I am very excited to kick-off my first series! I was originally going to post a delicious Balsamic Glazed Chicken recipe, but I wanted to kick this series off sooner rather than later, so the chicken will be for next week. Stay tuned!

Welcome to my Color Series! For each month, I’ve selected a color to represent that month or the holidays in that month. There were a few obvious ones such as February, October, and December, but for many of the months I had to think about what color might relate to them and why. There will be at least one recipe a month dedicated to that month’s color and my goal is to have an assortment of dishes: breakfast, lunch, dinner, snacks, or desserts. So now, January….

January is white! I picked white because, although it hasn’t snowed in January in a long time, I’ve always associated January with white tones. For New Year’s celebrations, Champagne is a white wine and many of the poppers, confetti, etc. are usually a white or silver material. Way back when, when I was very young, it used to snow in January. Even now, although it no longer snows very often, January is typically cold and windy, and even the air seems to have a white tone to it because of the morning frost that occurs.

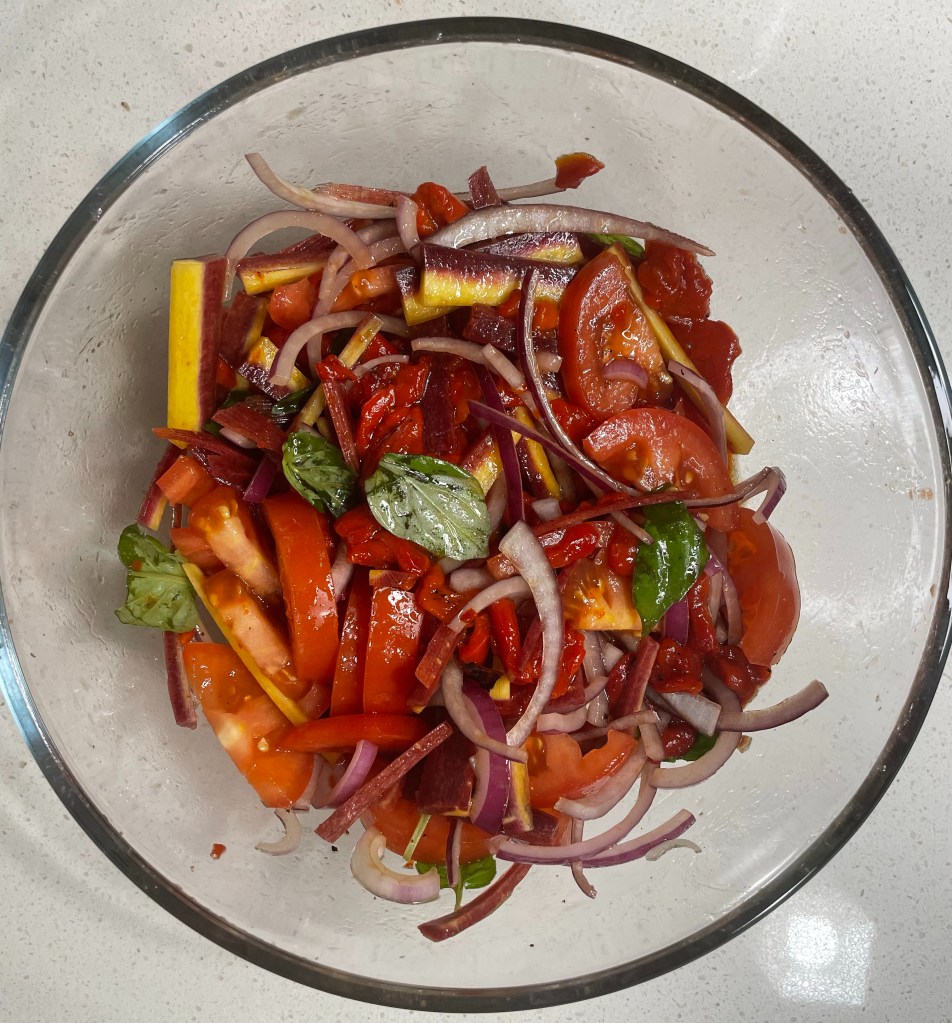
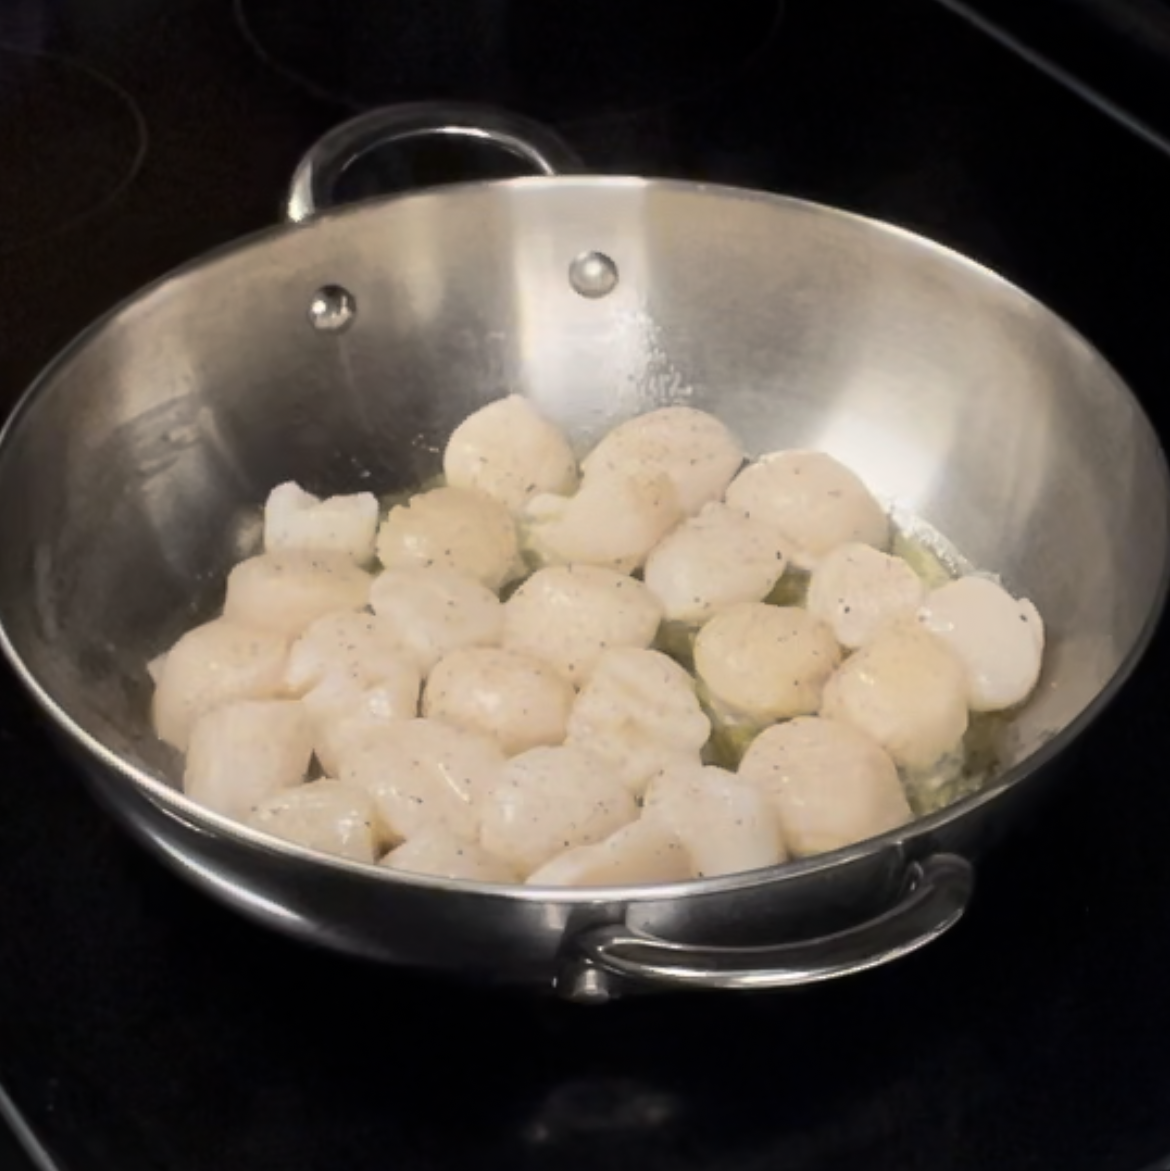
Thinking of white foods was initially very difficult. I thought of the usuals, garlic and white onion, but I couldn’t initially think of how to piece those together into a meal. Thankfully, Google exists, and was very helpful. The core of this white dish used garlic, white onion, white mushrooms, cauliflower, and sea scallops. Of course a few extra ingredients were included (that were not white). Check it out below and let me know what you think!


Seared Sea Scallops with Cauliflower Purée Sauce

Recipe List:

  • 4-5 garlic cloves, minced
  • 1 small/medium white onion, sliced or diced
  • 1 pack white mushrooms, sliced
  • 1 head cauliflower
  • 2 tablespoons olive oil
  • 1 bag sea scallops (between 1-2 pounds)
  • 2 tablespoons butter
  • 1/4 cup of chicken broth (plus a little extra for later)
  • 1 cup sour cream
  • 1 tablespoon lemon juice
  • A bundle of parsley
  • 1/2 pack of linguini*
  • Salt and pepper to taste

Recipe Directions:

  • Thaw your scallops if needed. Pat scallops dry to remove excess moisture.
  • Heat olive oil in skillet over medium-high heat until hot. Add scallops in single layer. In a separate pot, prepare water for boiling to make linguini (cooks for 8-9 minutes)*
  • Season with salt and pepper and fry for 2-3 minutes, then flip and fry again. remove from skillet.
  • Melt butter. Add in garlic, mushroom, and onion. Cook 1 minute.
  • Add chicken stock and bring to a simmer. Cook for about 2 minutes. Add sour cream and simmer until slightly thickened. Add lemon juice and parsley.
  • Remove mushroom and onion from skillet. Add cauliflower, small amount of chicken stock, and small amount of sour cream. Cook until cauliflower is tender.
    • Add enough liquid to just cover the cauliflower. If easier, transfer from skillet to a pot. If there is too much liquid, the sauce will not get thick enough.
  • Using a blender or an immersion blender, blend cauliflower and liquid into a purée.
    • Adjust consistency as needed – thickening by cooking further, or thinning by whisking in liquid.
  • Once blended to your liking, mix in linguine.
    • You can also mix in the mushrooms, onion, and scallops!
  • Serve scallop, mushroom, and onion mixture over linguini. Add parsley and additional sauce as needed.

*The steps are optional depending on preference


Since this is my first “big” recipe that I’m sharing, I thought I’d also share some lessons learned:

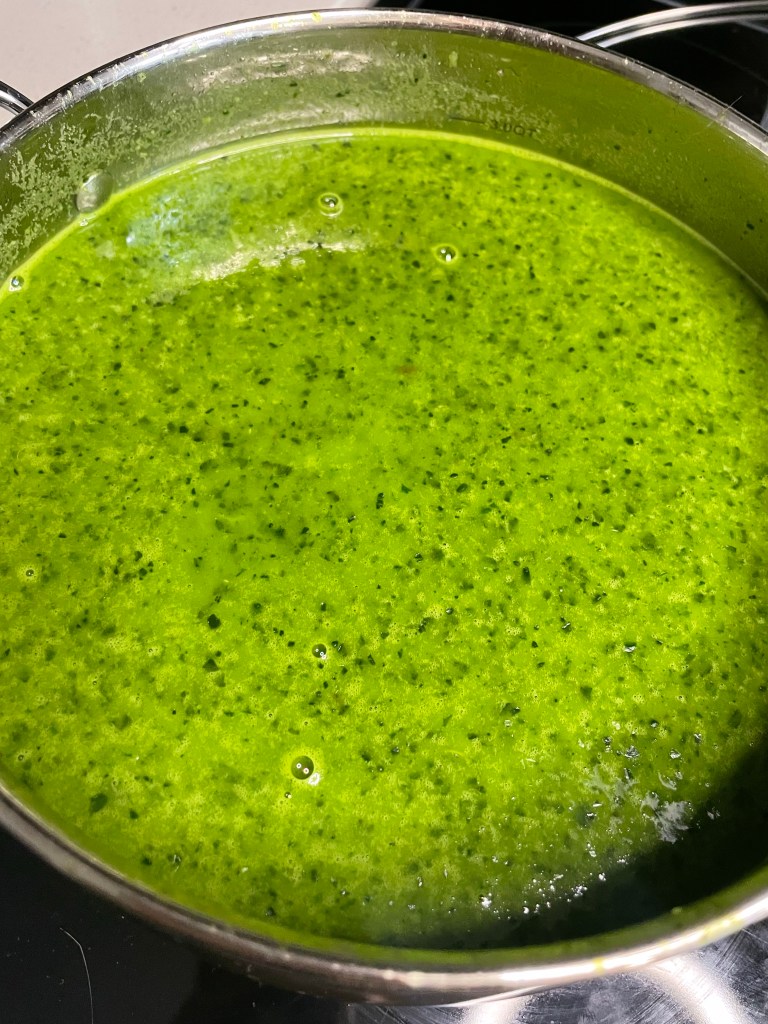
  • Making a purée is much harder than I thought it would be. As you can probably tell from the pictures, my purée didn’t turn out as I had intended. I think I added too much liquid, and I think the skillet I was using was not deep enough to use the immersion blender. I had a hard time getting the cauliflower to break down even though it was tender.
  • It was also my first time using an immersion blender. The directions on the pack say not to use the blender for more than a minute, and to let it cool for 4 minutes. I wasn’t sure how long blending would take, but I figured it would be quick. I think it’s quick if you know what you’re doing 🙂 I think I just became impatient and gave up/ Instead of a purée, I ended up with a delicious cauliflower sauce that mixed in with the linguini very nicely.
  • Biggest lesson: It doesn’t have to be perfect. This was still delicious and I would make it again. I had so many firsts in this dish (scallops, purée, blending), and it was so fun to learn new things and cook with ingredients I haven’t cooked with before. While it didn’t go according to plan, it tasted just as good, and possibly even better than what I initially had in mind. Just have fun with it!

Follow my page on Instagram to get the latest on new posts and blog activity:

https://www.instagram.com/gabmaria__/