Shinjuku Ramen

Disclaimer: Restaurant reviews are my own opinions. They are not done in partnership with any restaurant or company. They do not constitute an endorsement or an approval of any of the products, services or opinions of the corporation or organization or individual.


Manhattan, New York


I recently took a trip to New York with my sister. We had a fun dinner out with my parents and on Saturday we spent a rainy day at the Museum of Modern Art (MoMA). Not everything at the MoMA was really to my taste, but they’ve got some great works by Dali, Van Gogh, Picasso and many more. One artist they have is Claude Monet, who I am a big fan of, but I was a little disappointed that the only works on display were his Water Lily paintings. He has so many other great works! Regardless, it was a great way to spend a rainy day.

After MoMA, we decided it was time for a late lunch and we opted for ramen! We did a quick search and found this great place just a few blocks away called Shinjuku.

Shinjuku is a narrow but long restaurant. They fit so many tables in there for the space, but it didn’t feel cramped at all. Although it was after lunch, it was still peak lunch hour when we arrived. We waited about 15 minutes and then were seated.

Here’s what we ordered:
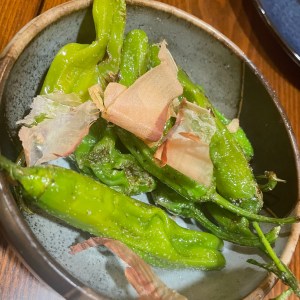

Shishito Peppers

We started with Shishito Peppers. These are stir-fried sweet green peppers, topped with salt. In my opinion, these are always a great appetizer, especially when you can split them. I find that they’re never too filling but just enough to help ease your hunger a little bit if you’ve been hungry for the whole afternoon. They’re very good!

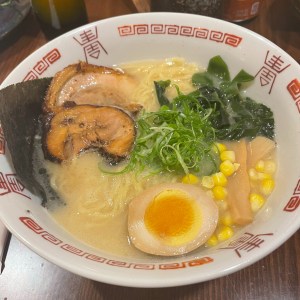
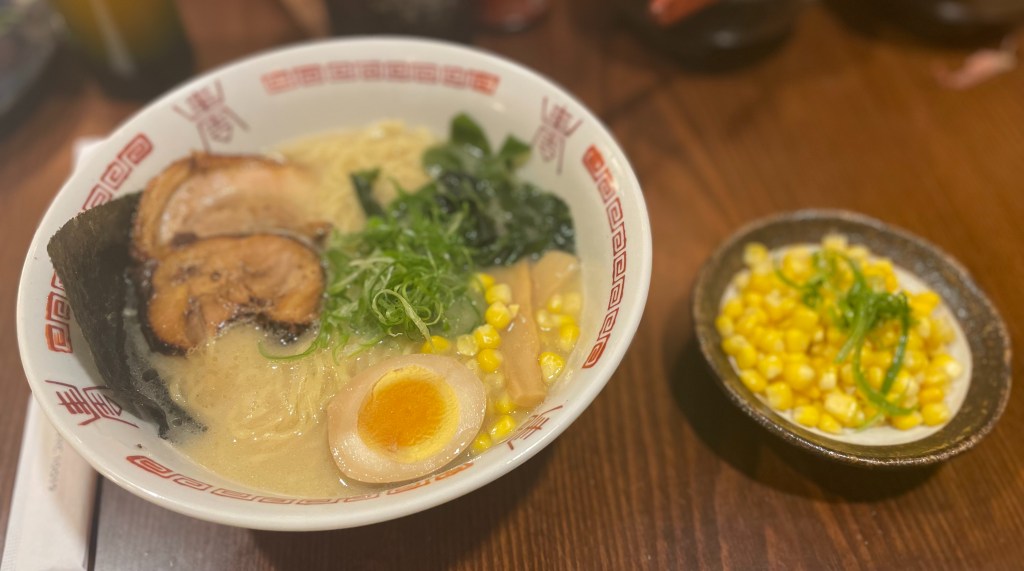
Tonkotsu King Tonkotsu Ramen

My sister and I both ordered the Tonkotsu Ramen. With the Tonkotsu Ramen you can either get pork belly chasu or chicken with bamboo shoot, egg, scallion, corn and seaweed in a pork bone broth. We both ordered the pork belly chasu and an additional side of corn to add into the ramen.


The ramen was DELICIOUS, and I highly recommend making a stop at Shinjuku if you take a trip to Manhattan. Oftentimes ramen leaves me feeling bloated and stuffed and I usually can’t finish it all because it’s so much food. This place was just enough. I finished everything, but I didn’t feel bloated or stuffed, but felt happily full.

Try it out and let me know what you think!


Follow my page on Instagram to get the latest on new posts and blog activity:

https://www.instagram.com/gabmaria__/

Yellow Rice with Lemon Garlic Chicken

Products listed are independently selected. If you buy from one of our links, we may earn a commission.


I’ve officially relocated for my new job role! Although I didn’t do much of the packing, it was a bit exhausting seeing how much stuff I have and imagining where it would all go in the new apartment. Thankfully, most items have found their place. There are a few things to put away still, but it’s coming together nicely. The kitchen was my biggest challenge! I was worried there wouldn’t be enough cabinet space for all the kitchen equipment, but thankfully the pantry is quite large, so I was able to keep some things in there.

I’m now living in a state and a city that I’ve never been in before. I was a little nervous at first and didn’t know what to expect, but the area has really grown on me, and I like it a lot. I’m excited to be somewhere new!

Although it was beautiful for my move and a few days after, the rest of the week was cloudy, rainy and cold. So, for April, I thought I’d bring a little color back with my Color Series! For April, we’re doing the color Yellow using a bit of turmeric!

Some suggested health benefits of turmeric include reducing inflammation and neutralizing free radicals in the body.

PULLED FROM CLEVELAND CLINIC

There are 3 aspects to most of my meals: the base, the veggies, and the protein. For the veggies this week, I diced up yellow bell pepper and yellow squash and sauteed them. Check out the recipe below to bring a little yellow to your meals!

Product Recommendations:

  • I use large reusable storage bags which are great for marinades and cutting down on waste – Stasher 1/2 Gallon Bags

Yellow Rice with Lemon Garlic Chicken

Rice Recipe List:

  • 2 cups long grain white rice
  • 2 tbsp butter
  • 1 small/medium onion, diced
  • 1 tbsp minced garlic (4 cloves)
  • 1 tsp turmeric powder
  • 3 cups vegetable stock
  • salt and pepper to taste
  • parsley to garnish

Chicken Recipe List:

  • 1 pack boneless, skinless, chicken breast
  • 1 lemon
  • 1 tbsp minced garlic (4 cloves)
  • 1-2 tbsp olive oil

Rice Recipe Directions:

  1. Rinse rice until water runs clear
  2. Melt butter in pot over medium heat. Sauté onion and garlic until fragrant (1-2 minutes).
  3. Add turmeric powder and combine. Stir in rice until lightly toasted and well coated.
  4. Mix in vegetable stock, salt, and pepper, and bring to a boil. Cover and reduce heat to low. Simmer for 15 minutes.
  5. Remove from heat and allow to cool for 5 minutes before fluffing. Add parsley to garnish.

Lemon Garlic Chicken Directions:

  1. Cut chicken into 1-inch cubes
    • If breasts are thick, slice in half to thin
  2. Slice lemon into 4 wedges
  3. In 1/2-gallon bag, add chicken, lemon juice, lemon wedges, olive oil, garlic.
  4. Allow to marinate for 1-hour minimum. Then cook.

Follow my page on Instagram to get the latest on new posts and blog activity:

https://www.instagram.com/gabmaria__/

Basic No-Knead Bread

Products listed are independently selected. If you buy from one of our links, we may earn a commission.


I am not a baker by any means. Baking cookies, even with directions, is something I find difficult. Although I enjoy cooking, baking is a whole different game to me. With that being said, I really want to learn how to bake, especially bread.

This No-Knead Bread is a great recipe for beginners to try out. I was amazed at how easy and hands-off this process was. The most. hands-on experience I got from this recipe was mixing the ingredients at the beginning. I found this to be much easier to do with my hands rather than a spatula, spoon or whisk.

Overall, this bread was easy to make and was delicious! After baking, I sliced my bread and stored it in the freezer to make toast for breakfast or as a snack.

Cooking Recommendations:

  • Dutch Oven with an oven-safe lid up to 500º – Amazon Basics Dutch Oven is a great choice
  • A sustainable way to cover your dough as it rises – Beeswax Wrap
    • I personally love using Beeswax wrap for almost anything! They’re great to have in the kitchen

Basic No-Knead Bread

Recipe List:

  • 3/4 tsp active dry yeast
  • 2 tsp sea salt
  • 3 1/4 cups all-purpose flour
  • 1 1/2 cups warm water

Recipe Directions:

  1. Mix ingredients, except water, in a large bowl.
  2. When combined, add water and stir until well mixed
    • The dough will be very sticky and not hold a shape
  3. Cover bowl and let dough rise at room temperature overnight (or 6-8 hours)
  4. Add flour to your countertop or onto parchment paper
    • Transfer dough to surface and fold dough onto itself a few times to shape
    • If sticky, sprinkle more flour
    • Cover with a kitchen towel and let dough rise for another hour
  5. At the 30-minute mark, heat oven to 450º with Dutch Oven inside
  6. Remove Dutch Oven from oven
    • Using parchment paper, transfer dough into Dutch Oven
    • Cover and bake for 30 minutes
      • If you don’t have an oven safe lid, you can use aluminum foil
    • Remove lid and bake for another 10-20 minutes
  7. Remove and transfer bread to a cooling rack for 15-30 minutes before serving

Follow my page on Instagram to get the latest on new posts and blog activity:

https://www.instagram.com/gabmaria__/